Getting started with Subform
Get familiar with the basic concepts behind Subform and start thinking responsively, while you design.
Introduction
In Subform, you can create layout rules and relationships that help you establish your design intent: how much space is between elements, how an element should stretch when the screen gets bigger, and so on.
This guide covers some of the basics of Subform’s layout system—enough to get you up-and-running quickly.
Adding boxes, text & images
To add a box to the artboard, click the Add Box Mode button in the app toolbar. Like traditional drawing tools, you can simply click-and-drag out a box to your desired dimensions:
To exit the box adding mode, just hit esc or press the Add Box Mode button again.
Adding a box this way makes it a self-directed element: you can drag and resize it in a freeform manner. You can also add boxes that are parent-directed: their layout is controlled by their parent and takes into account other elements.
Enter Add Box Mode again and instead of dragging, try clicking on the artboard a couple times. You’ll see that boxes are added in a stack—the more boxes you add, the smaller they get.
You can also add boxes inside of other boxes by hovering over them and then clicking. Adding boxes this way is great for quickly sketching out interface elements.
To add text, click the Add Text button in the app toolbar, or press T. A text box will be added as a child of the element you currently have selected.
To add images, click the Import Images button in the app toolbar, then select an image from your filesystem. Images are always imported as self-directed elements at their native size.
Parent-child relationships
On the left side of the Subform UI, you’ll see the Tree tab. This works much like a traditional layers panel, except that it exposes the structural relationships between elements. When you drag one element into another in the tree, that element becomes a child of the parent element into which it was dragged.
In the above example, text and an icon are dragged into a button element. Now when you move that button around the artboard or duplicate it, its children will come along. This is similar to a group in Sketch or Photoshop.
Unlike groups, however, parent elements can control the layout of their children. Right now, the icon and text are centered in the button. What if you wanted to horizontally align them both to the left side?
When you select the button element, you’ll see the Children Layout control group on the bottom right side of the Subform UI, under the Layout tab.
With children layout controls, you can affect the spacing and alignment of all the children in a parent at once. To left-align the icon and text, we’ll set the main axis space before to be 10. The main axis space after will be set to 1s_10, which means the right side should take up all the available space (“stretch”), but have a minimum value of 10. We can also add some more spacing to the top and bottom of the button by setting the cross axis space before and after to similar values.
Don’t forget that self-directed elements ignore their parent’s children layout settings. They control their own layout and aren’t affected by any of their siblings.
Layout types
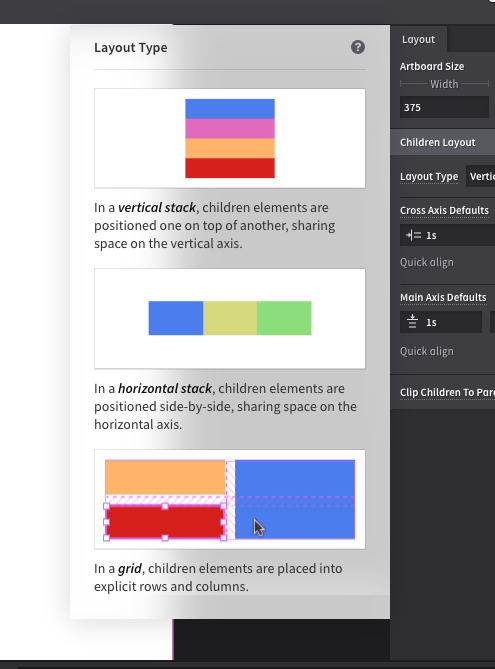
Another important setting in the Children Layout control group is the layout type. Parents can arrange their children in one of three ways:
In a horizontal stack, elements are arranged in a line from left to right. The main axis determines element width, while the cross axis determines element height.
In a vertical stack, elements are arranged in a line from top to bottom. The main axis determines element height, while the cross axis determines element width.
In a grid, elements span one or more columns and rows. The grid settings on the parent determine the number of columns, rows, and the grid gutters and margins. Elements can be moved around the grid by dragging and resizing:
If you only have one child in a parent, you won’t notice any visual change when you switch between horizontal and vertical stacks. Add a second child to see the difference.
When you add children to a grid, they’ll always start off in the top left cell. Elements can overlap in grids, so use the tree if you can’t find the element you’re looking for.
Stretch & hug units
You make elements responsive in Subform by using the stretch unit, s. While 100 is an absolute value, 1s is a relative one. Its exact size can vary, depending on its relationships with other elements.
Imagine you have two boxes, both set to a width of 1s. Instead of being fixed, the boxes now stretch in width to take up all the available space, even as the window resizes:
In this case, both boxes are dividing up the available space evenly. What if you wanted the first box to be three times as wide as the second one? Change its width to 3s:
The first box will now always be three times wider than the second box, but they both still stretch out to make sure all of the available space is used up. Specifying sizes and spaces this way is an important part of creating responsive UIs, so be sure to read more about how Stretch units work.
Another unique sizing unit in Subform is hug. Use this unit (with no number value) when you want a parent element to take on the size of its children, or hug its content. A classic example is when you want a button to automatically resize when its label gets longer or shorter:
Head-up display (HUD)
Sometimes it can be difficult to tell exactly how the layout rules are affecting the element you have selected. That’s where the HUD comes in. You can toggle it on and off by pressing the alt key:


 Move over, .psd and .sketch !
 ) If you set the text child to have a fixed width, say,